...continued from previous page
Faux Effects Techniques
PaintPRO magazine recognizes that consumers want finishes that are both decorative and unique to their style of living. Just as commercial/ industrial contractor Soep Painting (this issue's Painter of the Month) has incorporated decorative finishes into its portfolio of services, any contractor, whether large or small, can learn new skills that will make his or her company stand out from the rest.
• Marmorino Effect
Contributed by Frank Vittorio for Atova International
Preparation is key
Perhaps the most important step in applying a traditional Marmorino effect is ensuring the stability and condition of the substrate to which the product is applied. Some important things to look for are unleveled areas, obvious nicks and racks, nail holes, peeling and deteriorated areas, all of which need to be repaired.
The Marmorino Effect
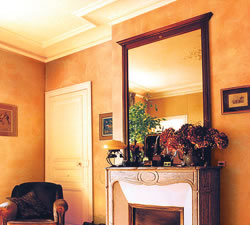
Created using a Lime Spatula, the “Marmorino Effect” is a natural plaster based on calcium oxide. It is an interior/exterior product with a porous surface which permits the exchange of elements such as oxygen, water, carbon dioxide, sulfur, etc. It requires oxide pigments, which are tolerant to the active minerals in the plaster as well as resistant to ultraviolet rays. It can be used to create smooth decorative effects, both polished and matte, or used as a base for texturized applications.
Apply a medium size amount of Lime Spatula to the edge of a clean trowel using a mixing knife.
Tips: It is a good idea to keep your bucket covered with a moist rag. Never scrape dried product from the edges of the bucket into the fresh product. Bits of cured product may add unwanted scratch marks to the finish. Before applying the first coat, it is a good idea to roll on one thin coat of Acrylic Fixative for added anchorage.
Figure 2: Spread a thin layer of Lime Spatula onto the substrate. When working with multiple walls in a room, it is important to work with sections you are confident you can complete during the same session. Spread the first coat thin and evenly throughout the area. Max Meyers Lime Spatula “Marmorino Application” requires thin layers, less than .5mm thick. Applying polished plasters too thick could create a crackled effect.
Tips: When applying Lime Spatula, it is not necessary to focus on creating patterns or encaustic effects during the first coat. You will have plenty of time to create such effects during the final coat.
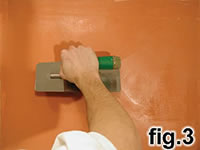
Figure 3: After a thin, first coat has been applied, trowel off any excess product. During this step, do not try to polish the surface. Lime Spatula will polish after one coat; however, for this application, the surface should be left matte.
Tips: If, at this point, there is a significant amount of white showing through the first coat, repeat fig. 2 again. Using a Fine Quartz primer is recommended as it provides a smooth and porous surface for mineral products such as Lime Spatula to absorb into. However, if applying Lime Spatula over a standard primer, sanding with 100 sandpaper before the first coat should eliminate such problems.
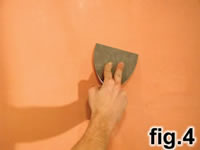
Figure 4: Depending on humidity, condition of the preparation products, and types of substrate, dry times may very. It is always a good idea to wait at least 3-4 hours if possible. Although the product may seem dry, it needs to harden as much as possible before a second coat is applied over it.
Tips: Before adding a second coat, check the surface for dried product and remove with a tool such as a spatula. Areas where there is an excessive build-up of product may be sanded with 500 or 600 sandpaper; however, sanding is not required for this specific application.
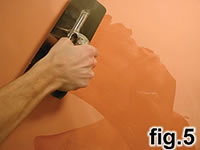
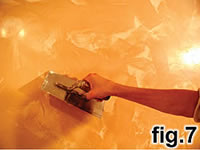
Figure 5: For the second and final coat, there are two basic methods of application. A), a trowel application, which creates larger and more wavy patterns. B) a spatula application, which creates a more detailed and homogeneous effect. Whichever application you choose, make sure you stick to a stainless steel tool, preferably with rounded edges to prevent scratching.
Tips: Here you may begin to create your artistic pattern. Remember to work 2-3 sq. ft. sections and completely finish them before moving on to the next area. During a Marmorino application, it is important to seal or polish the product while it is still wet.
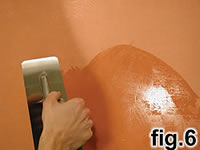
Figure 6: Polishing the Lime Spatula while it is still wet is important. Activating the Calcium within the natural product creates magnificent sheen and hardens the material. Learning to control your tool by holding it at various angles is an important part of a good plaster application. Practice with this will allow you to apply product, remove the excess, and seal it without having to change tools.
Tips: Leaving uneven edges of completed patches to be connected by subsequent sections will make seams and connections more blended. Applying Lime Spatula in particularly hot or dry areas may increase dry times significantly. If this happens, make sure the product is well mixed and fluid, and kept sealed with a moist rag.
Once the second coat is complete, you may begin to polish. To do this, simply pass the trowel over the area several times. Lime Spatula is mold-proof and resistant to water; however, it is a porous material. For complete sealing, wax may be used some days after the application.
Visit the Atova International Web site

|