...continued from previous page
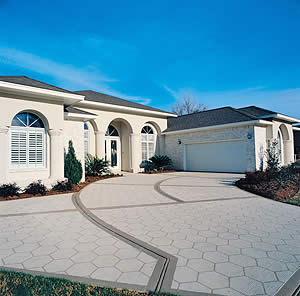
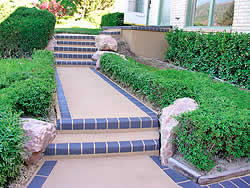
Concrete Stencil
Stenciling existing Concrete. Expand your business oportunities. Concrete could be a progressive painter's next frontier.
by Stacey Enesey Klemenc
If the concrete slab is structurally sound, it’s fair game for stenciling. In the words of Sadleir, “Don’t remove it; improve it.” Experts in the concrete industry agree that prepping — just as in painting — is the key to a successful stenciling job.
As long as the concrete hasn’t been previously sealed, the first thing you do is clean it. Some contractors like to pressure wash it with a wand or a scrubber using a mild detergent. Others prefer to use a stiff broom brush with a commercially made degreaser. Most follow the initial washdown with a mild acid wash using a hydrochloric or muriatic acid or an etching solution to make the concrete feel like sandpaper. If it’s really dirty, some do a second acid wash. Finally, the surface needs to be neutralized by going over it with a soda ash and water or an ammonia and water mixture.
If the existing slab has been sealed, you’ll first need to determine what type of bond-inhibiting material was used and remove that before thoroughly cleaning it. “Acid doesn’t attack sealers so you’ll need a stripper that’s designed to remove those types of materials,” Thome says. “If you don’t know what it is, a mechanical preparation — such as shotblasting, grinding or scarifying — is probably the best way to go.”
 After the surface has been thoroughly cleaned, repair any existing cracks or gouges. Burgan recommends “opening up the cracks” with a special tool prior to cleaning for long-lasting results. Following the cleaning, he first primes and then repairs the cracks. After the surface has been thoroughly cleaned, repair any existing cracks or gouges. Burgan recommends “opening up the cracks” with a special tool prior to cleaning for long-lasting results. Following the cleaning, he first primes and then repairs the cracks.
With the concrete properly prepped, you’re now ready to prime it and then apply the base coat, which will serve as the grout line color. But first, Burgan says, it’s prudent to properly mask off the area to be serviced.
“When using a stain or sealer, you can roll out or spray the base coat, but after you put the stencil down you should spray the top coat for the cleanest look,” advises Diana Strongosky, Sherwin-Williams Co.’s product manager for H&C concrete stains. “If you roll on a xylene-based silicone acrylic sealer, the sealer rewets itself, therefore losing the stencil effect. A handheld HVLP sprayer is going to work the best and is the fastest (for the H&C line of products).”
“We recommend using a hopper gun — the same type you’d use to texture a ceiling — or a trowel, like what you would use to apply Venetian plaster,” says Scofield’s Thome. “It provides an interesting texture for improving abrasion and slip resistance.”
 He suggests flat troweling or using a metal squeegee to apply the first coat to get a good level working surface for the next layer. “Imperfections, like chips, holes and divots, can be taken care of best by troweling,” he says. “When applying the second coat, the sprayer nozzle can be adjusted for different textures. Sometimes it’s more friendly to the feet to follow up with a light troweling, creating what is called a ‘knock-down’ finish.” He suggests flat troweling or using a metal squeegee to apply the first coat to get a good level working surface for the next layer. “Imperfections, like chips, holes and divots, can be taken care of best by troweling,” he says. “When applying the second coat, the sprayer nozzle can be adjusted for different textures. Sometimes it’s more friendly to the feet to follow up with a light troweling, creating what is called a ‘knock-down’ finish.”
Burgan says he uses a hopper gun with an air compressor 95 percent of the time. “The air pressure of the hopper gun plays with the texture,” he explains. To apply the coating, “I shoot lightly and shoot again like any painter would normally do.”
After the base coat is in place, some contractors like to apply a “fog coat of a colored sealer” with an airless sprayer, says Atwater. “They get about 500 square feet per gallon yield,” he explains. After this is dry, the template goes down and the next coat is shot or troweled on. When dry, it should be “groomed” to get rid of any loose gravel and such, followed by an application of clear or colored sealer. Finally, the template is pulled up and the job is done.
Cementitious toppings can be bought integrally colored in a wide variety of standard hues, as well as in custom blends. You also can spray on a colored sealer or concrete stain to achieve the coloring you want, dust on a colored release agent or mix a powdered color with a liquid release. Some contractors like to use a combination of these colored products for a more realistic look.
Burgan says that after he shoots the initial brick or stone color, he often goes back with a “very wet” second or third color. “There’s no set formula,” he says. He’ll turn up the air to create a fine mist and “shadow” the pattern — light here, heavier there — to create realistic-looking bricks with multiple hues. Or he’ll make a thicker mixture close to that of the original color and turn down the air to get random flecks of material “like a speckled cake batter mix” for added texture and slight variations of color. “When I pull up the stencils, the pattern really comes alive.”
Sadleir says that you also can spray a thin coat of liquid release on the overlay and use texture skins or rollers to create a natural texture that looks like real stone or brick. You can follow this step with a dark-colored transparent mixture made of “between 1 and 4 ounces of antique powder to 1 gallon of liquid release agent. Spray that out of a pump-up sprayer and let it puddle in low areas of the texture. That will give it an antique look.”
With this technique, he says, “You’ll get the closest look to quarter-inch stamping without having to stamp.”
A stenciled overlayment has several advantages over ripping out the old concrete and starting again. For one, you need less protection of surrounding areas, says Thome, adding that you can charge anywhere from $4 to $7 a square foot depending on how elaborate the design is. Comparatively, he says, it can cost anywhere from $5 to $8 a square foot to rip out old concrete and replace it with plain concrete.
Strongosky points out that you can easily freshen up stenciled concrete by re-stenciling right over the top of the old design, when a xylene-based silicone sealer has been applied. “You wouldn’t have to remove the current stain,” she says. “And if you want the stencil effect to last even longer, you can put a clear gloss sealer over the design and you might never have to touch the product used for the stencil design itself, just reapply the clear-gloss sealer.”
Depending on the environment and the traffic, the surface should be sealed with an acrylic sealer every two to five years.
Those in the business say resurfaced concrete lasts as long as plain concrete. “You’re just adding another layer of a specialized cement paste developed for resurfacing which is actually more durable than the concrete substrate,” Thome points out.
If you’d like to try your hand at stenciling but would be more comfortable learning from a pro, there are several companies that offer training on an ongoing basis. Among them: The Scofield Institute offers classes in Atlanta, as well as on-the-job training around the country through its distributors and contractors. Stencil Systems holds regular two-day seminars in Texas and Utah, as well as at various locations around the country. And Concrete Solutions offers a training class every month in Las Vegas.

|