 |
 |
 |
 |
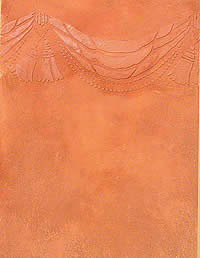 |
| You can, with the same product, create a smoother surface for a more subtle look, adding visual impact with a relief design. Just pull the material through a stencil and then glaze. |
Textured Walls, Beautifying
Previously Textured Surfaces
Michele Santilli, co-founder of the decorative painting school NASODA, shares a technique for beautifying previously textured surfaces.
by my students for suggestions on treatments for already textured surfaces. In certain areas of the country there is an abundance of textured walls, whether knockdown plaster or sand texture. Whether it’s a shortage of skilled drywall tapers or just a regional preference, I don’t know. There could be great opportunity for any of you tapers and plasterers out there... but in the meantime, I do have some recommendations for a simple, decorative treatment.
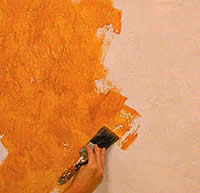
Once the walls are primed and base-coated with your preference of latex paint or waterborne coating, you’re ready to begin. If you are creating your own texture, as I did for the pictorial steps, I can recommend the use of Versiplast VP400, part of the Smooth Rock line by Briste Group. It’s a flexible lightweight premixed acrylic material that adheres to prepainted surfaces without the use of a primer. Glazes can be applied directly to the Versiplast texture without a base paint, saving both money and precious time. It can be tinted with universal colorants.
I have created a glaze using Glaz 333, by Artisan Imports, and an acrylic pigment. Earth tones work very well for an old-world appeal. I prefer to use Glaz 333 as it has extremely long open time, allowing for ease in keeping a wet edge. Apply a thin coat of glaze with a brush (your favorite will do) in a crosshatch pattern. Glaz 333 is very liquid, so brush marks will begin to blur before you even begin to soften. Do not apply the glaze thicker to get more open time as you might do with other acrylic glazes ...this one is different.
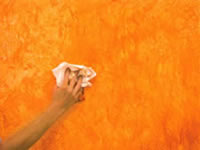
Pat lightly with a dry, soft, loosely held rag to create gentle drifts of color, turning the rag often. Have extra rags ready for when they get saturated. (Some glazes may require a damp rag ...this one does not)
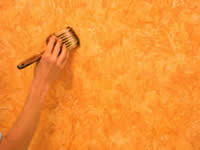
Soften with a lilly (hog hair) softener. There should be variation of color created not only by the rag, but also from the color remaining in the recesses of the texture.
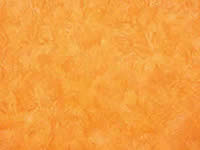
Voila! This is a “big bang for the buck” treatment: one layer of color with a lot of variation of tonality. In this case I have created quite a lively texture for clients who love a bit of drama.
Learn more about NASODA. For more information on Glaz 333, call Michele Santilli at (630) 833-5050. For more information about the Briste Group.

|