Vinegar Painting
on Furniture
In the field of furniture refinishing and painting, there are innumerable methods to create every finish imaginable. But one common faux painting technique used on furniture is vinegar painting.
by Elizabeth Gillette
that can be obtained lend themselves particularly well to creating wood grain and other patterns. The technique consists of applying a thin layer of color over a dried base coat. The top acidic layer can be manipulated and reworked until it has reached the artist’s desired effect. This technique dates back to before settlers arrived in the United States, and due to its beautiful results and versatile nature, it remains popular with artists today.
 Bill Russell, of Bill Russell Studio in Philadelphia, Pa., has painted furniture and taught this technique for years. In his book “Decorative Furniture Finishes with Vinegar Paint,” he outlines the techniques behind creating pieces or artwork using the technique. Bill Russell, of Bill Russell Studio in Philadelphia, Pa., has painted furniture and taught this technique for years. In his book “Decorative Furniture Finishes with Vinegar Paint,” he outlines the techniques behind creating pieces or artwork using the technique.
The first step, he explains, is finding a suitable piece of furniture. Simple pieces with plain surfaces display patterns best. Avoid furniture with a large amount of textured surfaces and features such as drawers and knobs. Also, avoiding veneer and open-grained woods, such as oak, keeps the pattern more visible. Furniture made of solid, close-grained woods such as pine, poplar, maple and alder work best, although other surfaces, such as metal and laminates, can also be painted.
For the piece outlined here, Russell found a particularly plain piece of furniture that called for a more exotic finish.
The first step for refinishing pieces such as this is to remove all doors and hardware, sand the entire piece, and fill all holes and scratches. Sand the surface again and wipe clean with naphtha or mineral spirits.
Next, prime the cabinet, and when dry, sand again using 150-grit sandpaper. Apply a base coat to the entire piece using latex or oil enamel, and sand again. Apply a second layer of base coat.
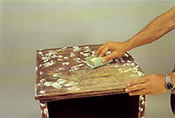
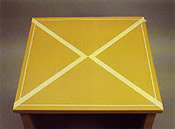
At this time, measure and lay out any patterns or borders on the furniture using masking tape on top of the base coat. Reinforce the tape using painters’ tape. Loosely brush in the first layer of desired color onto the surface. Manganese Violet is what is used on this piece.
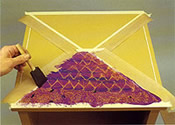
Add secondary color using a watercolor brush. Prussian Blue is used here. At this time the desired pattern — whether wood-grained or more exotic like in these images — should be applied. When dry, apply one coat of varnish.
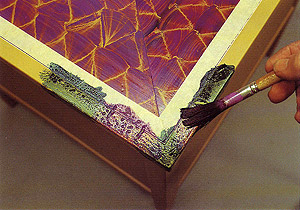
Move to other sections of the piece, moving and reapplying tape as needed to maintain borders.
Repeat this for each additional surface on the furniture until the piece is covered in the desired patterns.
 |
 |
The next step is to finish the cabinet using a solvent-based coating. Because vinegar paint is water-soluble, this must be done to prevent the paint from damage. The traditional finish for vinegar paint is oil-based varnish. This is available with a flat, satin, semigloss or glass finish. Polyurethane varnish is another option, and is available in the same sheens as traditional varnish. It dries quicker and forms a more durable film, so it is often an even better option. Whichever finish you choose, apply the first coat gently to avoid marring the pattern. Russell suggests thinning the first coat of varnish with mineral spirits to make the finish gentler and to allow it to penetrate the pigment. Also, be cognizant of applying the finish in a consistent direction and covering the entire piece. For the second coat, use undiluted varnish and follow the manufacturer’s instructions to determine how long to wait between coats. After the second coat dries, sand lightly to reduce brushstrokes. You can apply as many coats as necessary to create a smooth and solid finish.
Russell also suggests rubbing out the finish with a steel wool pad. Work with long consistent strokes and use a lubricant such as Behlen’s Wool-Lube.

|