|
Painting Tips, Color Additives
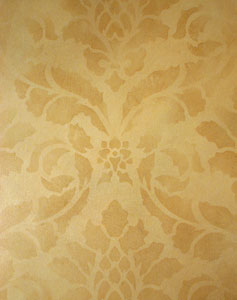
Stenciling Project: One of the easiest and most elegant techniques for combining a stenciled pattern with a faux finish is to stencil with a translucent glaze over a softly glazed background using the same color.
To create the “Color Blush” background, simply apply the tinted glaze in random patches with a foam brush or roller. Here, Melanie Royals used Aquaglaze latex glazing medium mixed with separate colors of satin latex paint. The glaze to paint ratio is generally 4:1. Two closely related brown and gold colors have been applied in random patches using 3-inch foam brushes.
Use a stippler in a circular motion to move the glaze over the wall, blending it out into the uncovered areas to fill them in with soft, mottled color. You can even use the stippler as a softening brush, if necessary, after blending by lightly brushing over the glaze as you go.
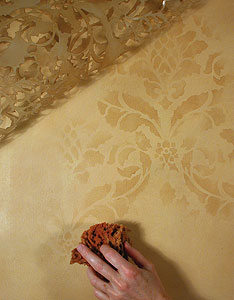 After your glaze finish is dry, use the same glaze (add a touch more latex paint color if desired) as your stenciling medium. Stenciling with a glaze gives you a more translucent look and the medium “goes farther,” meaning you don’t have to reload your brush as often. It also means that you are working “wetter,” so be sure and offload your brush extra well so you don’t have seepage under the edges of the stencil. After your glaze finish is dry, use the same glaze (add a touch more latex paint color if desired) as your stenciling medium. Stenciling with a glaze gives you a more translucent look and the medium “goes farther,” meaning you don’t have to reload your brush as often. It also means that you are working “wetter,” so be sure and offload your brush extra well so you don’t have seepage under the edges of the stencil.
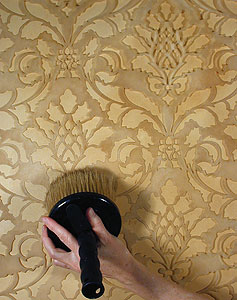
Place some of the glaze into a roller pan. Use a foam brush to apply the glaze to the textured portion of the roller pan and load the stippler from there. Remove excess glaze from the brush by rubbing it in a hard, circular motion on a dry terry towel or rag. Your stippler is now a very large stenciling brush, which allows you to cover a lot of stenciling territory very quickly.
 Using a “painterly” effect with allover designs will keep them from looking like ordinary wallpaper. Rather than filling the stencil in solidly and shading and defining each edge, allow the color to fade in and out throughout the design. Vary your pressure as you work, building up more color by applying more pressure in some areas and just touching other areas very lightly with the brush. The trick is to not concentrate on defining the design by developing each area distinctly with paint. This technique is known as “lost and found edges.” By using this technique with a large “production pattern,” you can actually accomplish your stenciling layer in the same amount (or even less!) time that it took you to complete the glaze layer. The translucency of the stencil design allows the subtle texture and variation of the mottled glaze to show through, creating a desirable sense of age and depth. Using a “painterly” effect with allover designs will keep them from looking like ordinary wallpaper. Rather than filling the stencil in solidly and shading and defining each edge, allow the color to fade in and out throughout the design. Vary your pressure as you work, building up more color by applying more pressure in some areas and just touching other areas very lightly with the brush. The trick is to not concentrate on defining the design by developing each area distinctly with paint. This technique is known as “lost and found edges.” By using this technique with a large “production pattern,” you can actually accomplish your stenciling layer in the same amount (or even less!) time that it took you to complete the glaze layer. The translucency of the stencil design allows the subtle texture and variation of the mottled glaze to show through, creating a desirable sense of age and depth.
Thanks for this tip go to Melanie Royals of Royal Design Studio.

|