Paint Glaze, AquaGlaze™
Negative Glazing with AquaGlaze™. The “negative” glazing technique, which consists of taking away color instead of adding, is the choice of professionals. This technique allows the artisan to have more control over the “shades” of the glazing color. Negative glazing creates the illusion of texture without layer upon layer of paint on the walls.
, which consists of taking away color instead of adding, is the choice of professionals. This technique allows the artisan to have more control over the “shades” of the glazing color. Negative glazing creates the illusion of texture without layer upon layer of paint on the walls.
The beauty of this finish is that the shape and texture of the sponge does most of the work. The artisan is needed for the finesse and orchestration of the “ins” and “outs” of the color. Try not to plan too much ahead; the beauty of the finish will develop naturally. To begin your project there are a few items that are needed in order to begin. Any brands, manufacturers or specifications mentioned in this article are recommendations only; feel free to use what works best for you when completing your project. Latex acrylic paint is one of the major purchases for this project. It is best to use 100% acrylic latex for the best durability, which may be purchased at your local paint store. A flat or satin finish is recommended for mixing into the glaze. Be sure to choose your color(s) carefully, you want to insure they compliment each other. The latex paint will be mixed with a glaze to produce a slow drying, easy to manipulate material. This brings us to the next major purchase, the glaze.
There are numerous products available to choose from. Most professionals recommend AquaGlaze™ by Faux Effects®. AquaGlaze™ is a clear medium intended for use with ordinary latex acrylic paint.
A roller and/or brush and, of course sponge(s) will also be needed. A roller or brush will be used to apply the glaze/paint mixture to your walls. Some professionals prefer a foam brush, which gives a smoother application. The size of your job will determine the size of the applicator.
When purchasing sponge(s) there are many types to choose from. Sponges range from celluose to sea; any type will work, keeping in mind each sponge will leave a distinct impression or “mark” in the glaze. The option of creating your own design by tearing divots of a foam sponge provides the artisans with the opportunity to create their own distinct texture. It is recommended that you test the sponge(s) before beginning to ensure you have the texture you wish to recreate. Using plain poster boards, which can be purchased at a local craft store, practice this application to ensure you are achieving the results you planned. Some final items needed are as follows:
- 2" masking tape
- Paint tray
- Paint measuring cup
- Paint stirrer(s)
- Bucket
- Rubber gloves (may be helpful)
Now that the supplies are purchased you are now ready to prepare for the application portion of the project. You will be mixing the glaze and latex acrylic paint to create an easy to use, slow drying product. A paint measuring cup or bucket and a paint stirrer will be needed.  Measure out your glaze first, you are mixing 90% glaze with 10% paint, or variances depending upon the amount of translucency desired. Once you have measured out your glaze (90%), add the latex paint (10%) and mix thoroughly. The color of your paint will lighten slightly when added to the glaze. This process occurs because a change has been made to the chemical makeup of the latex paint. The glaze may be mixed with any color latex paint. Measure out your glaze first, you are mixing 90% glaze with 10% paint, or variances depending upon the amount of translucency desired. Once you have measured out your glaze (90%), add the latex paint (10%) and mix thoroughly. The color of your paint will lighten slightly when added to the glaze. This process occurs because a change has been made to the chemical makeup of the latex paint. The glaze may be mixed with any color latex paint.
When your glaze/paint mixture is mixed thoroughly, it may be used over a primed or previously painted surface. If painting over a previously painted surface be sure that the existing paint is in good condition or you may need to apply a coat of a high quality semi-gloss or eggshell latex acrylic paint. This will provide a strong seal on the wall and maintain the slow drying effect of your glaze mix. AquaSeal™, by Faux Effects®, is a durable clear coat that seals porous wall paint. AquaSeal™ provides a high quality seal without the hassle of trying to match the existing paint color. Either method will work, remember the goal is to seal the old paint and maintain the slow drying effect of the glaze mix.
Your mixture may be stored in a seal container at approximately 71 degrees Fahrenheit for later use. Note: mix thoroughly before reusing.  Masking of non-paint areas needs to be accomplished before you can begin the application phase of your project. Use the 2" masking tape to mask off all non-paint areas of your room. Tape will be easily removed after paint has dried. You are now ready to begin your project. Masking of non-paint areas needs to be accomplished before you can begin the application phase of your project. Use the 2" masking tape to mask off all non-paint areas of your room. Tape will be easily removed after paint has dried. You are now ready to begin your project.
The following steps are designed to guide you through the negative glazing process. Results will vary with experience and technique. Before beginning this process you will need to gather the following supplies.
- Glaze/paint mixture
- Roller or brush
- Sponge(s)
- Bucket of clean water
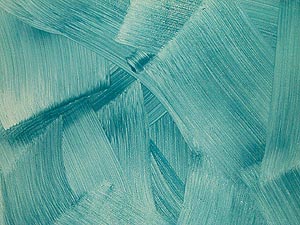
Step 1: Use a brush or roller to apply glaze/paint mixture to wall, with random strokes as shown in photograph below. Do not try to cover the entire wall with one application, cover small areas at a time in a continent type format.
Note: When using multiple colors apply lightest color first with a spotty random pattern. Add darker color filling in the open areas.
 Step 2: Wet sponge, ringing out excess water until slightly damp. This will prevent “dripping.” Step 2: Wet sponge, ringing out excess water until slightly damp. This will prevent “dripping.”
Step 3: Begin blotting in glazed area using a damp sponge. The sponge will remove mixture leaving a pattern behind. Continue blotting across surface turning your wrist often and changing direction allowing for a more random pattern when sponging. Step 4: Be sure to rinse out sponge often, or use multiple sponges and change them consistently. Step 5: Leave a wet edge of glaze and continue the process. If you are at a stopping point for the day, feather out your edges and begin from this point when you resume the project. Note: Repeat steps 1-5 until the project is complete. 
|

 Preparation for your project
