...continued on previous page
Drywall Texture
Hand Texture Finishes, Drywall Mud, Spanish Lace, French Lace. There's a growing interest in applied textures on walls and ceilings spells opportunity for painting contractors.
by Susan Brimo-Cox
Hand texture finishes are becoming more and more popular. They also let the contractor be more creative.
Pat Niehaus, owner of The Wall Doctor in Bayonet Point, Fla., says you can be very creative using general-use drywall joint compound (not topping compound). “Drywall mud gives more dimension than textured paint,” she says, though she does use textured paint, as well as lime wash, to create textures.
|
by Pat Niehaus, The Wall Doctor
1. Prep wall, sand, fill holes, sand, dust, and prime. Then put on a coat of sand finish paint (like the Ralph Lauren River Rock). This will be your grout lines. Let dry.
2. Plan out your brick pattern and mark the course lines with chalk on each side of the wall.
3. Use low-tack painters tape in 1⁄4-inch width, or whatever width of grout line you prefer. Run the tape lines horizontally to mask what will be the grout lines between courses of the faux bricks.
4. Next, from the top of the wall to the bottom of the wall, run lines of 1⁄4-inch tape 21⁄2 inches apart (or whatever distance is half the width of the brick size you have chosen). Then you will have a grid of squares. Cut out every other vertical grout line between the horizontal lines of tape to make it into bricks. When you finish one row, then go to the next row and cut out every other vertical grout line so the bricks are staggered. Continue until you have all your vertical grout lines the way you want them.
5. Next use either stucco or drywall mud, and tint the product that you choose to the color that you want your bricks to be. French Red is a good color. Then trowel on the mud or roll on with a textured roller (such as Whizz Tight Bag Roller).
6. Texture with a brush by pouncing lightly on the mud, and then use a knockdown tool to knock down the surface lightly.
7. Pull the tape before it dries.
8. Let texture dry overnight.
9. Then use watered-down acrylic paints to accent the face of the bricks. Take a picture of a real brick wall and duplicate the markings. I use a sea wool sponge roller and hit and miss each brick. Or use a piece of sea wool sponge and do it by hand. I use cream, white, brown and black. By watering it down it soaks into the surface of the dried mud.
10. Then take a regular rectangle kitchen sponge and dip the side edge in the black watered down paint and blot, and then put onto the bottom right side and the right edge of the bricks in the grout area to make it look like a shadow.
11. If you use drywall mud you will have to coat it with a coat of low-sheen polyacrylic sealer. If you use regular stucco material it dries waterproofed.
12. If you are going to use this technique outdoors make sure you use a product that is weather tight.
|
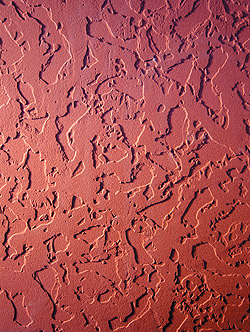
Niehaus says “French Lace” is a very popular texture in Florida. (I’ve heard this texture also called “Spanish Lace.”) Niehaus applies a skim coat of drywall mud and rolls over it with a tight bag roller to create a texture, then knocks it down to achieve the desired appearance.
“Santa Fe” is a popular texture in the Southwest. Annis describes it as a skim coat with a skiptrowel finish. “This is a very thick texture. It covers everything.”
Of course, with hand-decorated textures, the types of tools you can use are virtually unlimited. You can use combs, sponges, trowels with teeth, dauber tools with patterns, tight bag rollers, rollers with plastic closed loops, short bristle brushes, squeegees with “Vs” cut in them — you name it. You can make swirls, half circles, lines and ridges, precise patterns and random ones.
Niehaus also has developed techniques to use texture to mimic brick and stone. (See sidebar for her faux brick technique.) She says the key to good hand texturing is to be patient and not overwork it. “You try to make it perfect and you’ll make it worse.”
Also, keep in mind that repairing a textured surface can be difficult. The easiest to patch and repair are random pattern textures, such as splatter textures.
As a professional painter, you already know that surface preparation is 90 percent of the job.
Annis reports that for new drywall, the surface prep needed depends on the type of texture you will apply. He recommends a level 1-2 for popcorn, level 2-3 for splatter, level 3-4 for knockdown, and level 4-5 for Santa Fe. (See sidebar for “level” explanations.)
Niehaus likes to texture right over new drywall “because it sticks better.” She never textures over wallpaper, because the weight and moisture can cause it to pull down. On painted surfaces, “I always prime, and it has to be clean,” she says — no oils or grease. And if the surface is glossy, she sands the surface for grab.
After the texture is applied, be sure to seal it. “Painting is recommended because the texture compound is porous and rapidly collects dust,” Annis says.
Another tip Niehaus offers is, “I like to tell people that if they want the [textured] look, but don’t want it forever, I suggest hanging liner paper and texturing over it.” Then, jumping ahead into the future, when the client no longer desires the textured surface, “you just pull the liner paper down and the texture comes with it.”
With some exceptions, such as hotels and restaurants, commercial properties typically steer clear of textures, but the residential market can be very lucrative.
“It is giving the customer options,” Annis explains. “When people go to a restaurant, they ask to see a menu; they need options and so do home owners. Contractors that just offer painting are not taking advantage of their full potential — customers like innovative things.”
If you decide to offer machine-applied textures, you can usually get instruction from spray-equipment manufacturers on how to use their products. Gutierrez says he prefers to give demonstrations of his company’s texture spray equipment “because it eliminates any questions, uncertainties and problems in the future.”
Texture spray systems and hopper guns require an investment of one thousand to a few thousand dollars up front, depending on the system you choose. However, Gutierrez reports, “A lot of people will put the cost back into jobs and the equipment pays for itself quickly.”
If hand-applied textures appeal to you, you can experiment and come up with unique textures and techniques on your own.
But, in all cases, Niehaus cautions: “Play around with some ideas on a board before you tackle the wall.” Because, when it comes to texturing walls and ceilings, practice makes perfect.

|